🌐🔥TerraWeek Challenge 🔥🌐 Day6 : Terraform Providers

Driven Systems Administrator with 3 years of experience in software implementation and maintenance. Proven history of managing complex infrastructures and data center operations. Expert in solutions-oriented business application problem-solving and dedicated to providing best-in-class service. Skilled at troubleshooting, communication and collaboration.
📍 Introduction
🐧Welcome to the Day 6 of our blog series on Terraform! In this post, we'll describe you Terraform Providers and their role in interacting with different cloud platforms or infrastructure services. By the end of this day, you’ll gain a deeper understanding of Terraform Providers 🐧
👨🏻💻Task🛠️🚧👨💻
📚Task 1: Learn and Compare Terraform Providers
A Terraform provider is a piece of software that implements Terraform’s resource type definitions and implements the CRUD (Create, Read, Update, Delete) operations for those resource types. The provider acts as an intermediary between Terraform and the underlying infrastructure, allowing Terraform to interact with your resources.

Why Create a Terraform Provider?
There are several reasons why you might want to create a Terraform provider:
To support an infrastructure provider or service that Terraform doesn’t support natively.
To manage custom APIs, internal tools, or legacy systems that Terraform doesn’t support.
To simplify and standardize the management of infrastructure resources, reducing the risk of errors and making it easier to track changes.
To streamline the automation of infrastructure management tasks, saving time and reducing manual effort.
🎯Terraform providers and their significance in managing resources across various cloud platforms or infrastructure services.
❄Terraform providers are plugins that allow Terraform to interact with different cloud platforms, infrastructure services, or APIs. They enable the provisioning and management of resources in a unified and consistent manner, regardless of the underlying technology.
❄The Significance of Terraform Providers:
Unified Resource Management: With Terraform providers, you can manage resources across multiple cloud platforms or infrastructure services using a consistent workflow. This eliminates the need for learning and using separate tools or APIs for each platform, simplifying resource management.
Cross-Platform Compatibility: Terraform provides a wide range of providers that support major cloud platforms such as AWS, Azure, GCP, and more. This cross-platform compatibility enables organizations to adopt a multi-cloud strategy, leveraging the strengths of each platform without the hassle of managing them individually.
Infrastructure as Code (IaC) Practices: Terraform providers align with Infrastructure as Code principles, allowing infrastructure configurations to be defined as code. This brings benefits like version control, collaboration, and automated provisioning, resulting in more reliable and scalable infrastructure deployments.
Consistency and Standardization: Terraform providers ensure consistent infrastructure provisioning and management across different cloud platforms. By using a single tool and a declarative language, you can enforce standardized configurations, reducing complexity and ensuring uniformity.
Extensibility and Customization: Terraform providers offer extensibility, enabling users to develop custom providers or contribute to existing ones. This flexibility allows integration with specialized APIs, internal systems, or niche cloud providers, empowering organizations to tailor their infrastructure management to specific requirements.
Community Support and Ecosystem: Terraform has a thriving community that actively contributes to the development and maintenance of providers. This vibrant ecosystem provides a wealth of resources, modules, and best practices, accelerating adoption and facilitating knowledge sharing.
📚Task 2: Provider Configuration and Authentication
🎯(a) Explore provider configuration and authentication mechanisms in Terraform.
❄Provider Configuration: To configure a Terraform provider, you need to define it in your Terraform configuration file (typically named main.tf). The provider block specifies the provider name and any required configuration variables. Here’s an example of how to configure the AWS provider:
provider "aws" {
  region = "us-east-1"
}
❄In this example, we configure the AWS provider with the region variable set to “us-east-1”. The specific configuration options may vary depending on the provider.
❄Authentication Mechanisms: Authentication mechanisms vary for each Terraform provider. Here are some common authentication methods for popular providers:
1. AWS (Amazon Web Services):
Access Key and Secret Key: You can set the AWS access key ID and secret access key as environment variables or use the AWS CLI configuration to authenticate Terraform.
AWS CLI Configuration: Terraform can use the AWS CLI configuration files (~/.aws/config and ~/.aws/credentials) to authenticate with AWS.
2. Azure (Microsoft Azure):
- Service Principal Authentication: Azure uses service principals for authentication. You can create a service principal and configure its credentials (client ID, client secret, tenant ID) as environment variables or using Azure CLI configuration.
3. GCP (Google Cloud Platform):
- Service Account Authentication: GCP requires a service account key file to authenticate Terraform. You can download the JSON key file and set the GOOGLE_APPLICATION_CREDENTIALS environment variable to its path.
🎯(b) Set up authentication for each provider on your local machine to establish the necessary credentials for interaction with the respective cloud platforms.
❄Setting Up Authentication: To set up authentication for each provider on your local machine, follow these general steps:
Install and configure the respective CLI tool (AWS CLI, Azure CLI, GCP CLI, OCI CLI, DigitalOcean CLI) if required.
Obtain the necessary credentials for the provider:
AWS: Obtain an access key ID and secret access key.
Azure: Create a service principal and obtain the required credentials.
GCP: Generate a service account key file.
Set the credentials as environment variables or configure them in the respective CLI tool.
Define the provider configuration block in your Terraform configuration file, specifying the required variables such as region, credentials file path, access key, etc.
Run terraform init to initialize your Terraform configuration and download the necessary provider plugins.
❄With the authentication set up, you can now use Terraform to provision and manage resources in the respective cloud platforms by executing terraform apply, terraform plan, or other Terraform commands.
📚Task 3: Practice Using Providers.
🎯Gain hands-on experience using Terraform providers for your chosen cloud platform.
❄Step 1: Create a new directory named “terraweek_day6” and navigate into it.
mkdir terraweek_day6
cd terraweek_day6

❄Step 2: Create a main.tf file within “terraweek_day6” directory.
nano main.tf
❄Step 3 : Open the main.tf file within the terraweek_day6 directory and add the following code to define the EC2 instance resource:
a) AWS Provider:
· Specifies the AWS provider and sets the region to “us-east-1”.
provider "aws" {
  region="us-east-1"
 }
b) EC2 Instance (resource “aws_instance”):
· Deploys an EC2 instance using the specified Amazon Machine Image (AMI) ID and instance type.
· Associates a security group, key pair, and tags to the instance.
resource "aws_instance" "myec2" {
 ami= "ami-0d81306eddc614a45"
 instance_type= "t2.small"
 vpc_security_group_ids=[aws_security_group.ownsg.id]
 key_name = "tf-key-pair"
 tags={
  Name="terraform-example"
 }
 }
c) Security Group (resource “aws_security_group”):
· Creates a security group allowing inbound traffic on port 80 (HTTP) from any source.
resource "aws_security_group" "ownsg" {
  name="own-sg"
 ingress {
  from_port=80
  to_port=80
 protocol="tcp"
 cidr_blocks=["0.0.0.0/0"]
 }
 }
d) Key Pair (resource “aws_key_pair”):
· Generates an RSA key pair for SSH access to the EC2 instance.
· The private key is saved locally, and the public key is associated with the key pair resource.
resource "aws_key_pair" "tf-key-pair" {
 key_name = "tf-key-pair"
 public_key = tls_private_key.rsa.public_key_openssh
 }
 resource "tls_private_key" "rsa" {
 algorithm = "RSA"
 rsa_bits  = 4096
 }
 resource "local_file" "tf-key" {
 content  = tls_private_key.rsa.private_key_pem
 filename = "tf-key-pair"
 }
e) VPC (resource “aws_vpc”):
· Creates a custom VPC with the specified CIDR block.
resource "aws_vpc" "customvpc" {
  cidr_block = "10.0.0.0/16"
  tags = {
    Name = "Custom vpc"
  }
}
f) Internet Gateway (resource “aws_internet_gateway”):
· Creates an internet gateway and associates it with the custom VPC.
resource "aws_internet_gateway" "custominternetgateway" {
  vpc_id = aws_vpc.customvpc.id
}
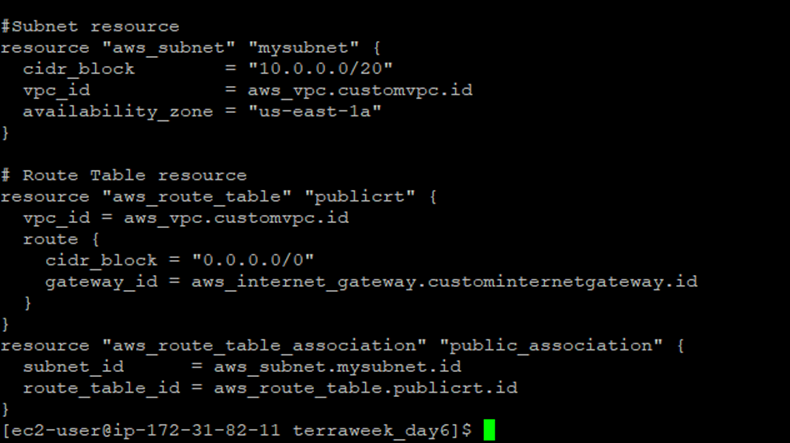
g) Subnet (resource “aws_subnet”):
· Creates a subnet within the custom VPC with the specified CIDR block and availability zone.
resource "aws_subnet" "mysubnet" {
  cidr_block        = "10.0.0.0/20"
  vpc_id            = aws_vpc.customvpc.id
  availability_zone = "us-east-1a"
}
h) Route Table (resource “aws_route_table”):
· Creates a route table associated with the custom VPC.
· Adds a default route to the internet gateway.
resource "aws_route_table" "publicrt" {
  vpc_id = aws_vpc.customvpc.id
  route {
    cidr_block = "0.0.0.0/0"
    gateway_id = aws_internet_gateway.custominternetgateway.id
  }
}
j) Route Table Association (resource “aws_route_table_association”):
· Associates the subnet with the route table.
resource "aws_route_table_association" "public_association" {
  subnet_id      = aws_subnet.mysubnet.id
  route_table_id = aws_route_table.publicrt.id
}
#Whole Code


provider "aws" {
  region="us-east-1"
 }

 #EC2 resource
 resource "aws_instance" "myec2" {
 ami= "ami-0d81306eddc614a45"
 instance_type= "t2.small"
 vpc_security_group_ids=[aws_security_group.ownsg.id]
 key_name = "tf-key-pair"
 tags={
  Name="terraform-example"
 }
 }

 #Security Group resource for  instance
 resource "aws_security_group" "ownsg" {
  name="own-sg"
 ingress {
  from_port=80
  to_port=80
 protocol="tcp"
 cidr_blocks=["0.0.0.0/0"]
 }
 }

 #key-pair resource for instance
 resource "aws_key_pair" "tf-key-pair" {
 key_name = "tf-key-pair"
 public_key = tls_private_key.rsa.public_key_openssh
 }
 resource "tls_private_key" "rsa" {
 algorithm = "RSA"
 rsa_bits  = 4096
 }
 resource "local_file" "tf-key" {
 content  = tls_private_key.rsa.private_key_pem
 filename = "tf-key-pair"
 }

 # VPC resource for instance
 resource "aws_vpc" "customvpc" {
  cidr_block = "10.0.0.0/16"
  tags = {
    Name = "Custom vpc"
  }
}

# Internet Gateway resource
resource "aws_internet_gateway" "custominternetgateway" {
  vpc_id = aws_vpc.customvpc.id
}

#Subnet resource
resource "aws_subnet" "mysubnet" {
  cidr_block        = "10.0.0.0/20"
  vpc_id            = aws_vpc.customvpc.id
  availability_zone = "us-east-1a"
}

# Route Table resource
resource "aws_route_table" "publicrt" {
  vpc_id = aws_vpc.customvpc.id
  route {
    cidr_block = "0.0.0.0/0"
    gateway_id = aws_internet_gateway.custominternetgateway.id
  }
}
resource "aws_route_table_association" "public_association" {
  subnet_id      = aws_subnet.mysubnet.id
  route_table_id = aws_route_table.publicrt.id
}
Step 4: Authenticate with the chosen cloud platform using the appropriate authentication method (e.g., access keys, service principals, or application default credentials).
· To configure the AWS CLI on your local machine by running the following commands in your terminal:
Use export commands
export AWS_ACCESS_KEY_ID=
export AWS_SECRET_ACCESS_KEY=
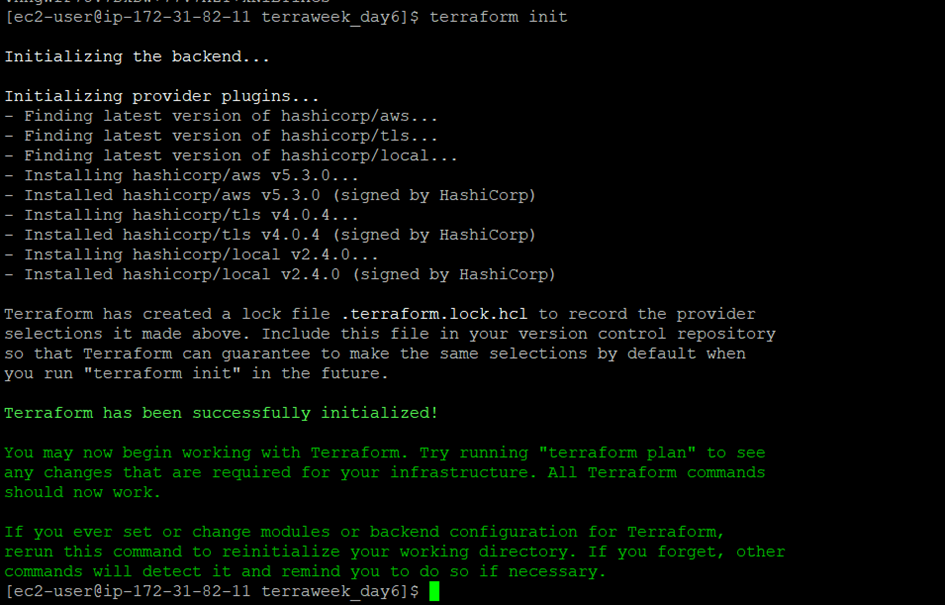
Step 5: Run the terraform init command to initialize Terraform and configure the backend.
terraform init
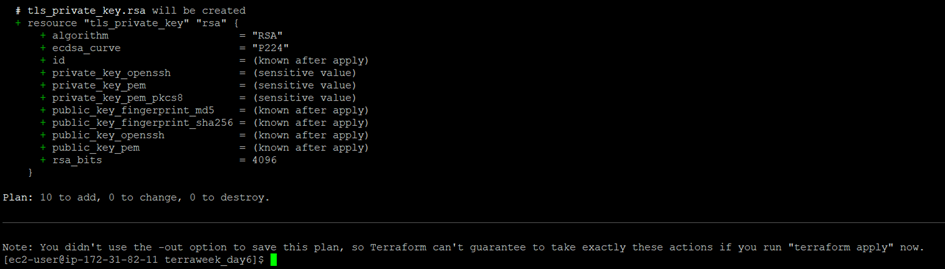
Step 6: Run terraform plan to preview the planned changes.

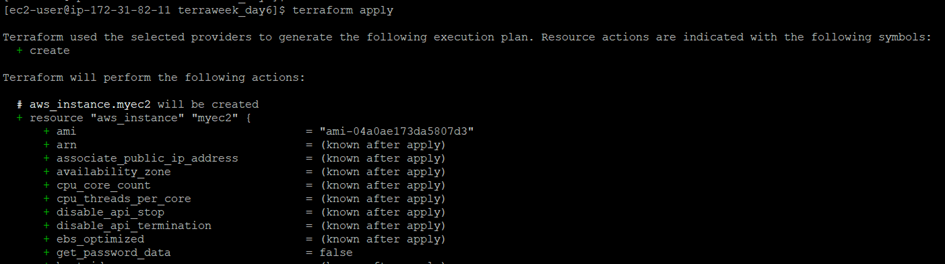
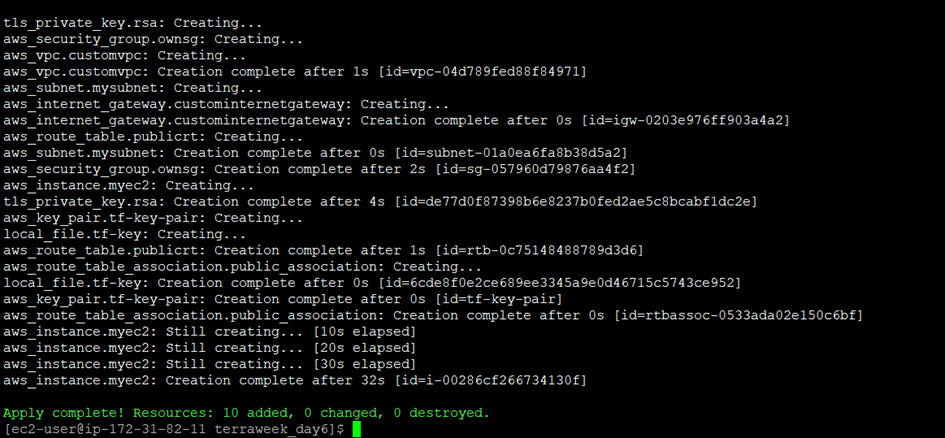
Step 7: If the plan looks correct, run terraform apply and confirm the changes to deploy the resources.
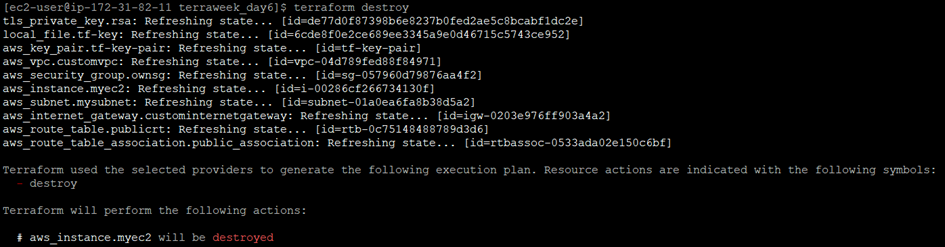
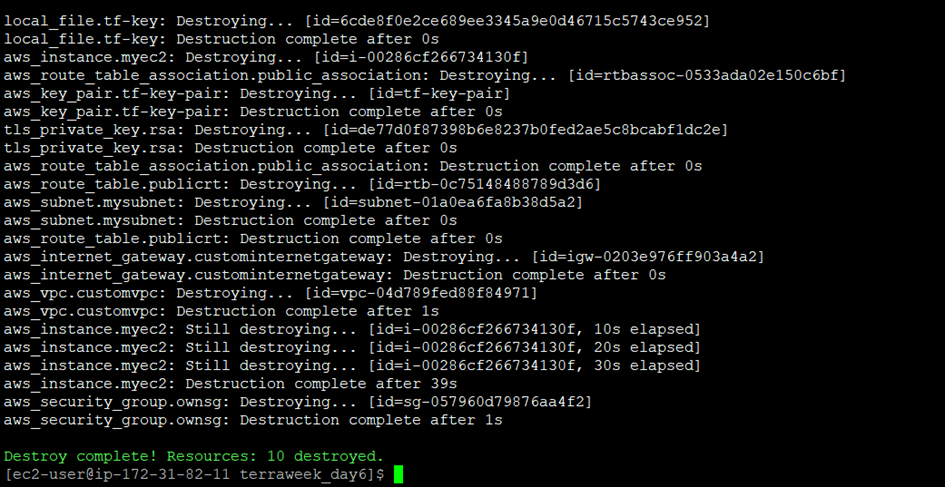
Step 8: Once you are done experimenting, use the terraform destroy command to clean up and remove the created resources.