

🐧Welcome to Day 1 of our blog series on Terraform! In this post, we'll introduce you to Terraform and cover the basics to get you started on your infrastructure provisioning journey. Let's dive in🐧
✍️What is Terraform and how can it help you manage infrastructure as code?
❄Terraform is an open-source infrastructure as code (IaC) tool developed by HashiCorp. It allows you to define and manage your infrastructure using declarative configuration files. With Terraform, you can provision and manage resources from various cloud providers, such as Amazon Web Services (AWS), Microsoft Azure, Google Cloud Platform (GCP), and more.
❄Using Terraform, you describe your desired infrastructure state in a configuration language called HashiCorp Configuration Language (HCL). HCL is designed to be easy to understand and human-readable, making it accessible to both developers and system administrators.
Here's an example to illustrate how Terraform works:
❄Let's say you want to provision a virtual machine (VM) on AWS. With Terraform, you would write a configuration file that defines the desired state of the VM, including its instance type, storage, networking, and other settings. The configuration file might look something like this :-
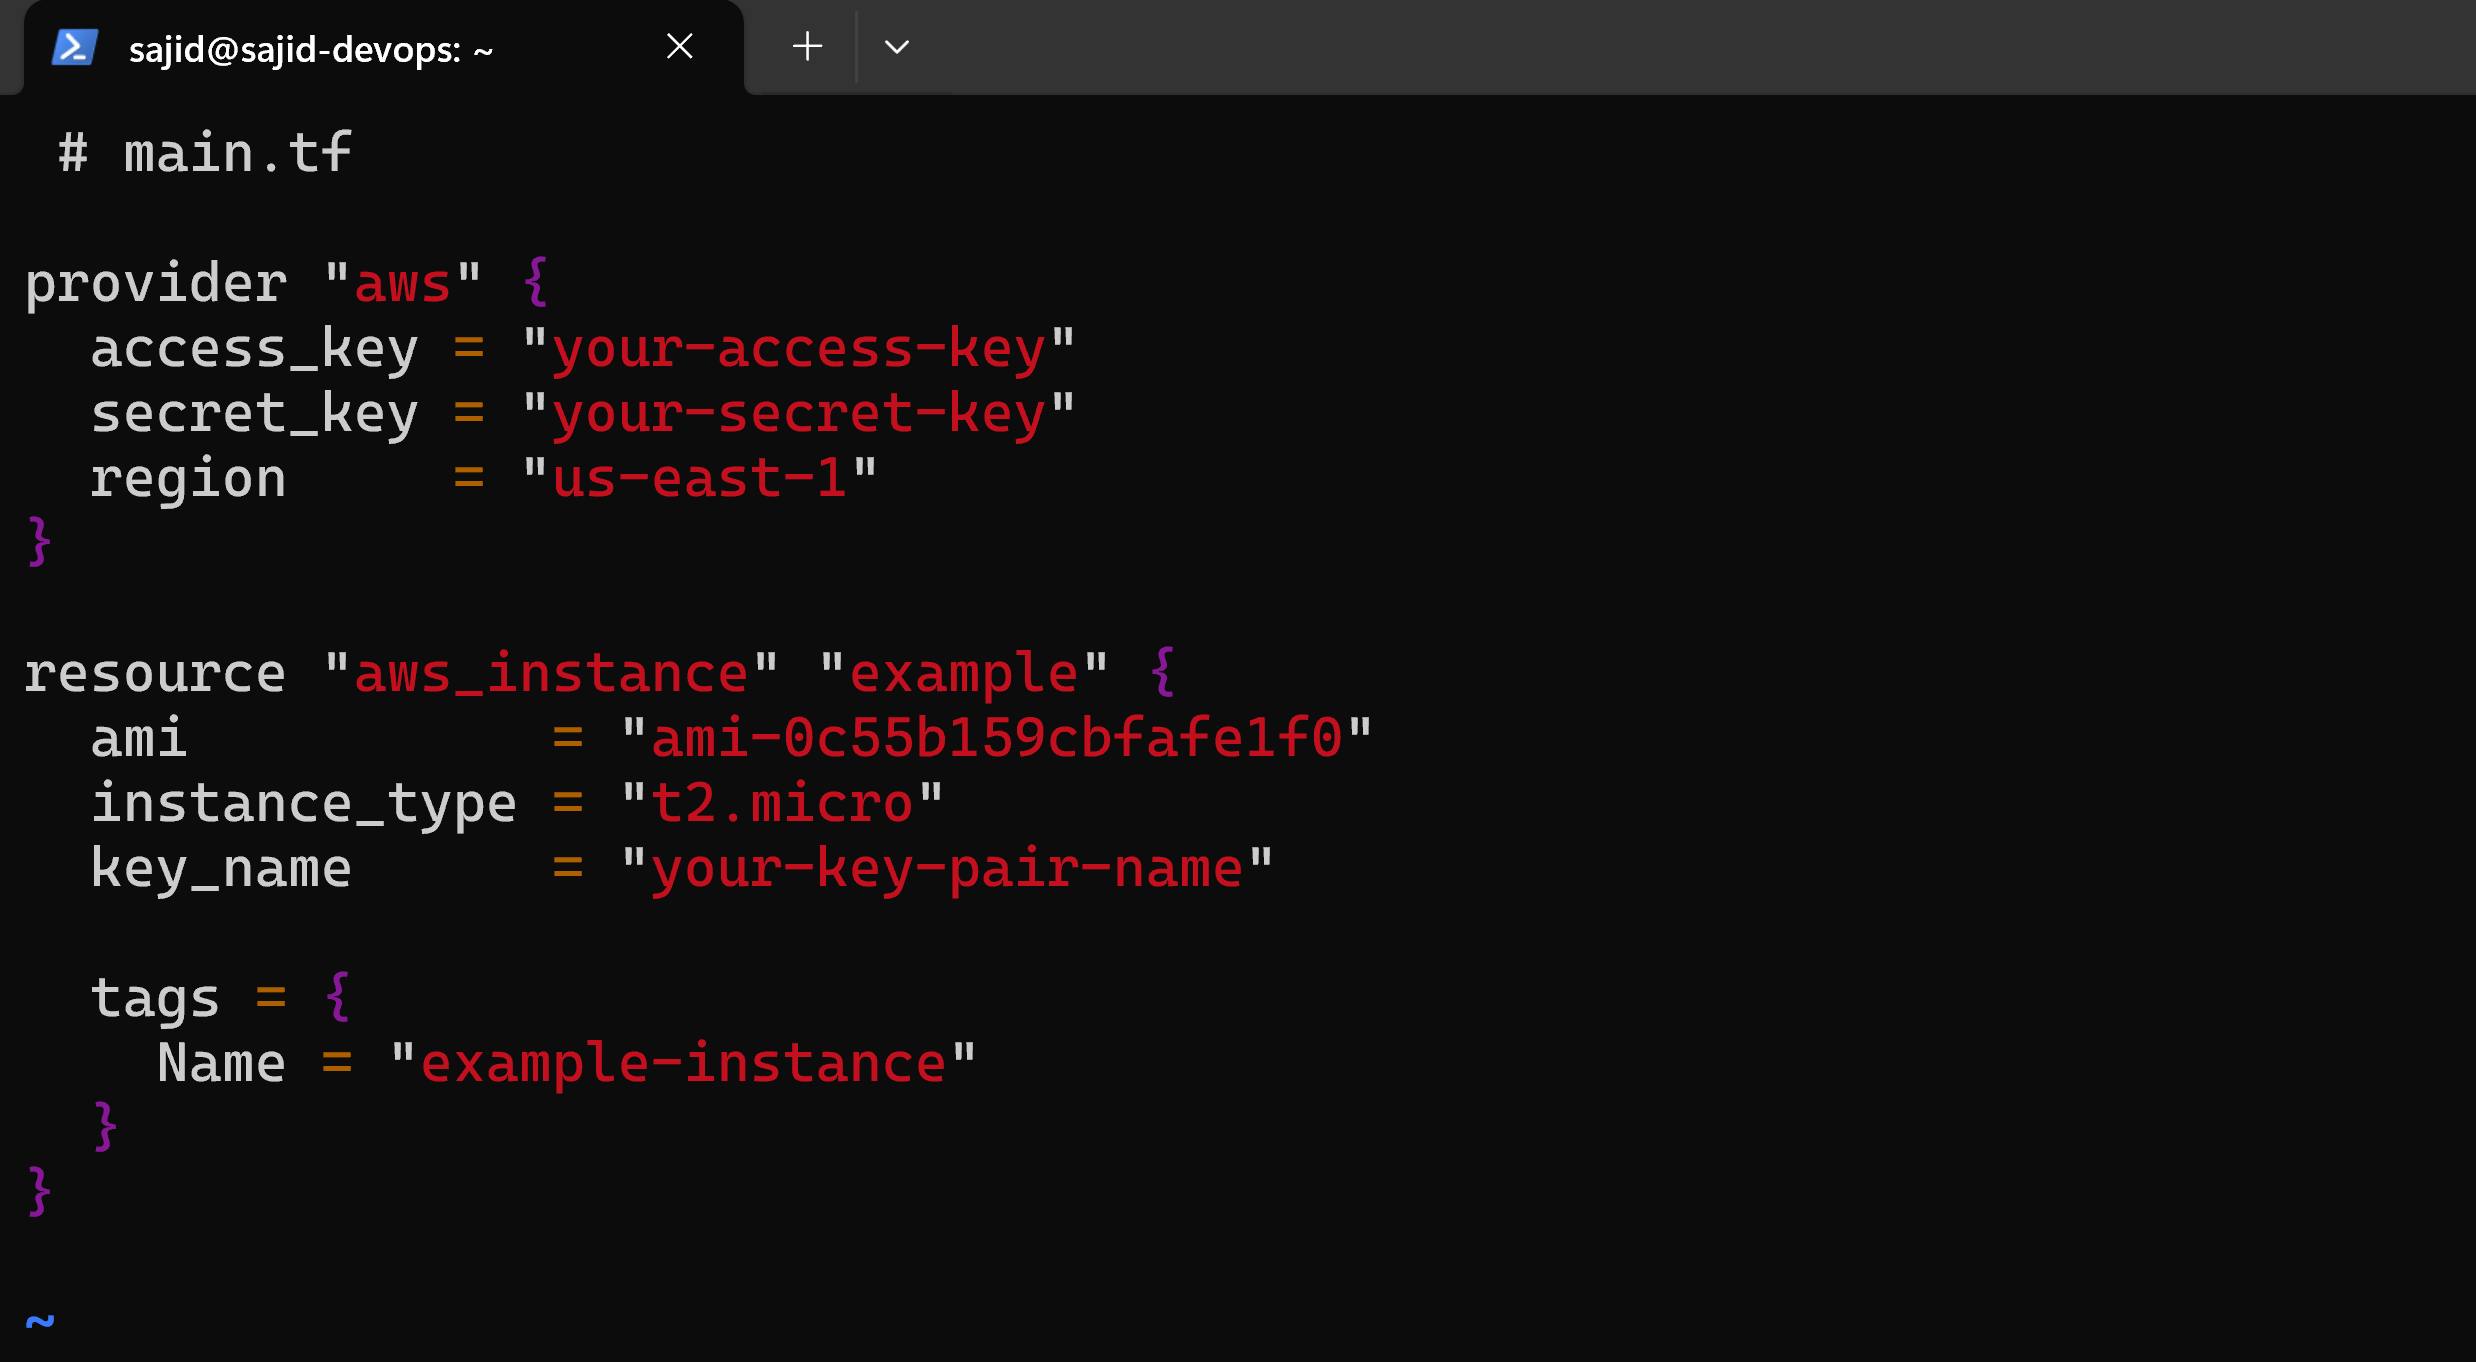
❄In this example, the configuration specifies that an AWS EC2 instance should be created. It specifies the instance's Amazon Machine Image (AMI), instance type, SSH key pair, and assigns a name tag.
❄Once you have written the configuration file, you can use the Terraform CLI to initialize, plan, and apply the changes. The CLI will communicate with the cloud provider's API and provision the necessary resources based on the defined configuration.
❄Terraform's real power comes from its ability to manage the entire lifecycle of your infrastructure. It can create, modify, and destroy resources while keeping track of their state. It also supports infrastructure versioning, allowing you to roll back changes if needed.
❄By using Terraform, you can automate the provisioning and management of your infrastructure. It provides a standardized and repeatable process, making it easier to collaborate with others and maintain consistency across different environments.
❄Overall, Terraform simplifies infrastructure management by abstracting away the low-level details of interacting with cloud providers. It enables you to define your infrastructure as code, making it easy to understand, version, and manage your infrastructure resources.
✍️Why do we need Terraform and how does it simplify infrastructure provisioning?
❄Terraform is an infrastructure provisioning tool that allows you to define and manage your infrastructure as code. It simplifies the process of provisioning and managing resources across various cloud providers, virtualization platforms, and services.
❄Here's an example to help illustrate the benefits of using Terraform:
❄Let's say you work for a company that develops web applications and uses a combination of cloud services, such as Amazon Web Services (AWS) and Microsoft Azure, to host your infrastructure. Traditionally, setting up and managing this infrastructure involves manually configuring and provisioning resources, which can be time-consuming, error-prone, and difficult to reproduce consistently.
With Terraform, you can define your infrastructure using a declarative language called HashiCorp Configuration Language (HCL) or JSON. You describe the desired state of your infrastructure, specifying the resources you need, their configurations, and any dependencies between them. Terraform then takes this configuration and provisions the infrastructure for you automatically.
❄Let's consider a simple example where you need to provision a web server and a database server on AWS. In your Terraform configuration, you define the desired AWS instances, specifying the instance types, security groups, network settings, and other parameters. You also define the relationship between the two instances, indicating that the web server depends on the database server.
❄When you run Terraform, it analyzes the current state of your infrastructure and determines what changes need to be made to reach the desired state. It then communicates with the cloud provider's API to create, update, or delete resources as necessary. Terraform keeps track of the state of your infrastructure, allowing you to make changes to your configuration and apply those changes incrementally.
🎯The benefits of using Terraform in this scenario are:
Infrastructure as code: By defining your infrastructure in code, you can version control it, apply best practices for collaboration, and easily share and reproduce the environment. It becomes a part of your software development lifecycle.
Automation: Terraform automates the provisioning process, saving you time and effort. You don't need to manually log into the cloud provider's console or write custom scripts to set up resources.
Consistency: Terraform ensures that your infrastructure is provisioned consistently, regardless of the environment or the person performing the provisioning. The same Terraform configuration can be used to create identical environments in different regions or for different teams.
Infrastructure state management: Terraform keeps track of the state of your infrastructure. This allows you to see the current state, plan and apply changes, and easily roll back if necessary.
Multi-cloud and multi-platform support: Terraform is cloud-agnostic and supports multiple cloud providers, virtualization platforms, and services. You can use the same tool and configuration to provision resources on AWS, Azure, Google Cloud Platform (GCP), or other platforms.
❄Overall, Terraform simplifies infrastructure provisioning by providing a consistent, automated, and declarative approach. It allows you to manage your infrastructure as code, enabling better collaboration, version control, and reproducibility of your infrastructure environments.
✍️How can you install Terraform and set up the environment for AWS, Azure, or GCP?
❄Installing Terraform and setting up the environment for AWS, Azure, or GCP is relatively straightforward. Here's a step-by-step guide on how to do it:
Install Terraform :- Start by downloading the Terraform binary from the official website (terraform.io/downloads.html) based on your operating system. Extract the downloaded archive and add the Terraform binary to your system's PATH.
Configure Cloud Provider Credentials :- For each cloud provider, you'll need to configure the necessary credentials to authenticate with their API. Here's how you can set up the credentials for each cloud provider:
AWS: Create an AWS IAM user with appropriate permissions for provisioning resources. Obtain the Access Key ID and Secret Access Key for the user. You can either configure these credentials using the AWS CLI (
aws configure) or set environment variables (AWS_ACCESS_KEY_IDandAWS_SECRET_ACCESS_KEY).Azure: Create an Azure service principal and obtain the Application ID, Subscription ID, Tenant ID, and Client Secret. You can either configure these credentials using the Azure CLI (
az login) or set environment variables (ARM_CLIENT_ID,ARM_SUBSCRIPTION_ID,ARM_TENANT_ID, andARM_CLIENT_SECRET).GCP: Create a GCP service account and obtain the Service Account Key in JSON format. Set the
GOOGLE_APPLICATION_CREDENTIALSenvironment variable to point to the path of the JSON key file.
Create Terraform Configuration :- Create a new directory for your Terraform project. Inside the directory, create a file with a
.tfextension (e.g.,main.tf) and write your Terraform configuration using the HCL or JSON syntax. This configuration describes the resources you want to provision in your cloud provider.For example, to provision an AWS EC2 instance, your
main.tffile may look like this :-provider "aws" { region = "us-east-1" } resource "aws_instance" "example" { ami = "ami-0c94855ba95c71c99" instance_type = "t2.micro" }Initialize and Apply :- Open a terminal or command prompt, navigate to your Terraform project directory, and run the following commands :-
terraform initThe
initcommand downloads the necessary provider plugins and sets up the backend.terraform initThe
applycommand analyzes your Terraform configuration, creates an execution plan, and prompts for confirmation. If everything looks correct, you can confirm the changes, and Terraform will provision the resources on your chosen cloud provider.Verify and Manage :- After the provisioning process completes, you can verify that the resources have been created successfully by checking your cloud provider's console or using their respective command-line tools.
To manage the infrastructure, you can make changes to your Terraform configuration file and re-run the
applycommand. Terraform will determine the necessary actions to reach the desired state and make the required updates.
Remember to clean up your resources when you're done by running terraform destroy. This command will remove all the resources created by Terraform, preventing any unnecessary charges from the cloud provider.
❄By following these steps, you can easily install Terraform, configure the cloud provider credentials, create your Terraform configuration, and provision resources on AWS, Azure, or GCP.
✍️**Explain the important terminologies of Terraform with the example at least (5 crucial terminologies)**
❄Certainly! Here are five crucial terminologies in Terraform explained with real-time examples:
1 :- Provider: A provider is a plugin that enables Terraform to interact with a specific cloud provider or service. Providers are responsible for translating Terraform configurations into API calls to provision and manage resources. For example, the "aws" provider allows Terraform to interact with Amazon Web Services. Here's an example configuration snippet :-
provider "aws" {
  region = "us-east-1"
}
❄In this example, the "aws" provider is configured to use the "us-east-1" region.
2 :- Resource: A resource represents a tangible piece of infrastructure that Terraform manages. It could be a virtual machine, a database, a network interface, or any other resource offered by the cloud provider. Each resource has a resource type and a set of attributes that define its properties. Here's an example of provisioning an AWS EC2 instance :-
resource "aws_instance" "example" {
  ami           = "ami-0c55b159cbfafe1f0"
  instance_type = "t2.micro"
}
❄In this example, an EC2 instance resource of type "aws_instance" is created with the specified Amazon Machine Image (AMI) and instance type.
3 :- Module: A module is a self-contained unit of Terraform configuration that encapsulates a set of resources and their configurations. It allows you to organize and reuse infrastructure code. Modules can be created and shared by the community or within your organization. For instance, you can create a module to provision a standard set of resources for your web application. Here's an example of using a module :-
module "web_app" {
  source = "github.com/example/web-app"
  version = "1.0.0"

  region = "us-east-1"
  instance_count = 2
}
❄In this example, the "web_app" module is used, which is sourced from a Git repository. It provisions a web application infrastructure with two instances in the specified region.
4 :- Variable: A variable allows you to parameterize your Terraform configuration. It provides flexibility and reusability by allowing you to pass values dynamically to your configuration. Variables can be defined in a separate file, through command-line flags, or using environment variables. Here's an example of defining and using a variable :-
variable "instance_type" {
  description = "EC2 instance type"
  default     = "t2.micro"
}

resource "aws_instance" "example" {
  ami           = "ami-0c55b159cbfafe1f0"
  instance_type = var.instance_type
}
❄In this example, the "instance_type" variable is defined with a default value. The variable is then referenced in the resource configuration.
5 :- State: The state file is a crucial aspect of Terraform that keeps track of the actual infrastructure state compared to the desired state defined in your configuration. It stores information about the resources managed by Terraform, their properties, and dependencies. The state file allows Terraform to understand the existing resources and manage changes effectively. Here's an example command to manage Terraform state :-
terraform state list
This command lists all the resources tracked by Terraform in the current state file.
🎯Understanding these key terminologies will provide you with a solid foundation for working with Terraform and managing your infrastructure as code🎯
With this basic understanding, you're ready to embark on your Terraform adventure. Stay tuned for Day 2, where we'll explore advanced Terraform concepts and dive deeper into provisioning infrastructure resources. Happy provisioning!
📝Feel free to ask me, if you need any help regarding this Terraform topic📚📝